
- May 28, 2026
- Posted by: Shane Daly
- Category: Trading Article

Many traders set profit targets backwards.
They start with the number they want. Then they look for a reason the chart might give it to them.
That is not planning.
That is wishful thinking with a calculator.
A profit target should start with market structure: prior highs, prior lows, support, resistance, volatility, trend strength, and nearby obstacles. Those details do not predict the future. They show where price has responded before and where the trade may start to lose its edge.
That is the point of a target.
Not certainty. Decision-making.
Key Takeaways
- Set profit targets around visible structure: swing highs, swing lows, support, resistance, consolidation zones, and prior reaction areas.
- Do not use fixed 2:1 targets unless the chart supports that distance.
- Plan the target before entry, before pressure changes your judgment.
- Treat the stop and target as one system. Your stop defines the risk. Your target must justify it.
- Use ATR, R-multiples, and trailing stops as tools, not automatic rules.
- Take partial profits only when price reaches a meaningful level. Nervousness is not a trading signal.

What Is a Profit Target in Trading?
A profit target is the price level where you plan to exit a winning trade.
A real target is not a round number. It is not the amount you want to make. It is not the point where you finally feel comfortable closing the trade.
It is a planned exit based on structure, volatility, risk, and trade context.
That does not mean every target will hit. Markets do not owe you clean exits. A target gives you a decision framework before the trade starts affecting your judgment.
Without a target, you are not managing the trade.
You are waiting to see how you feel.
Why Your Profit Target Should Be Set Before You Enter
You should not build the exit after you enter.
Once money is at risk, your thinking changes. A normal pullback feels threatening. A strong candle makes you greedy. A slow move makes you impatient. The chart may be nearly the same, but your interpretation is no longer neutral.
That is why the target belongs in the pre-trade plan.
Before entry, you can map the structure, measure the risk, check the distance, and decide whether the setup is worth taking. After entry, you are more likely to negotiate with yourself.
A planned target gives the trade a job. It tells you what needs to happen, where the opportunity may weaken, and what decision you will make when price gets there.
If you cannot define the target before entry, the setup is not ready.
Why a 2:1 Risk/Reward Target Is Not Always Enough
A 2:1 reward-to-risk ratio is useful.
It is not a strategy.
R-multiples help you judge whether the potential reward is large enough relative to the risk. They do not tell you whether price has a realistic path to the target.
That answer comes from structure.
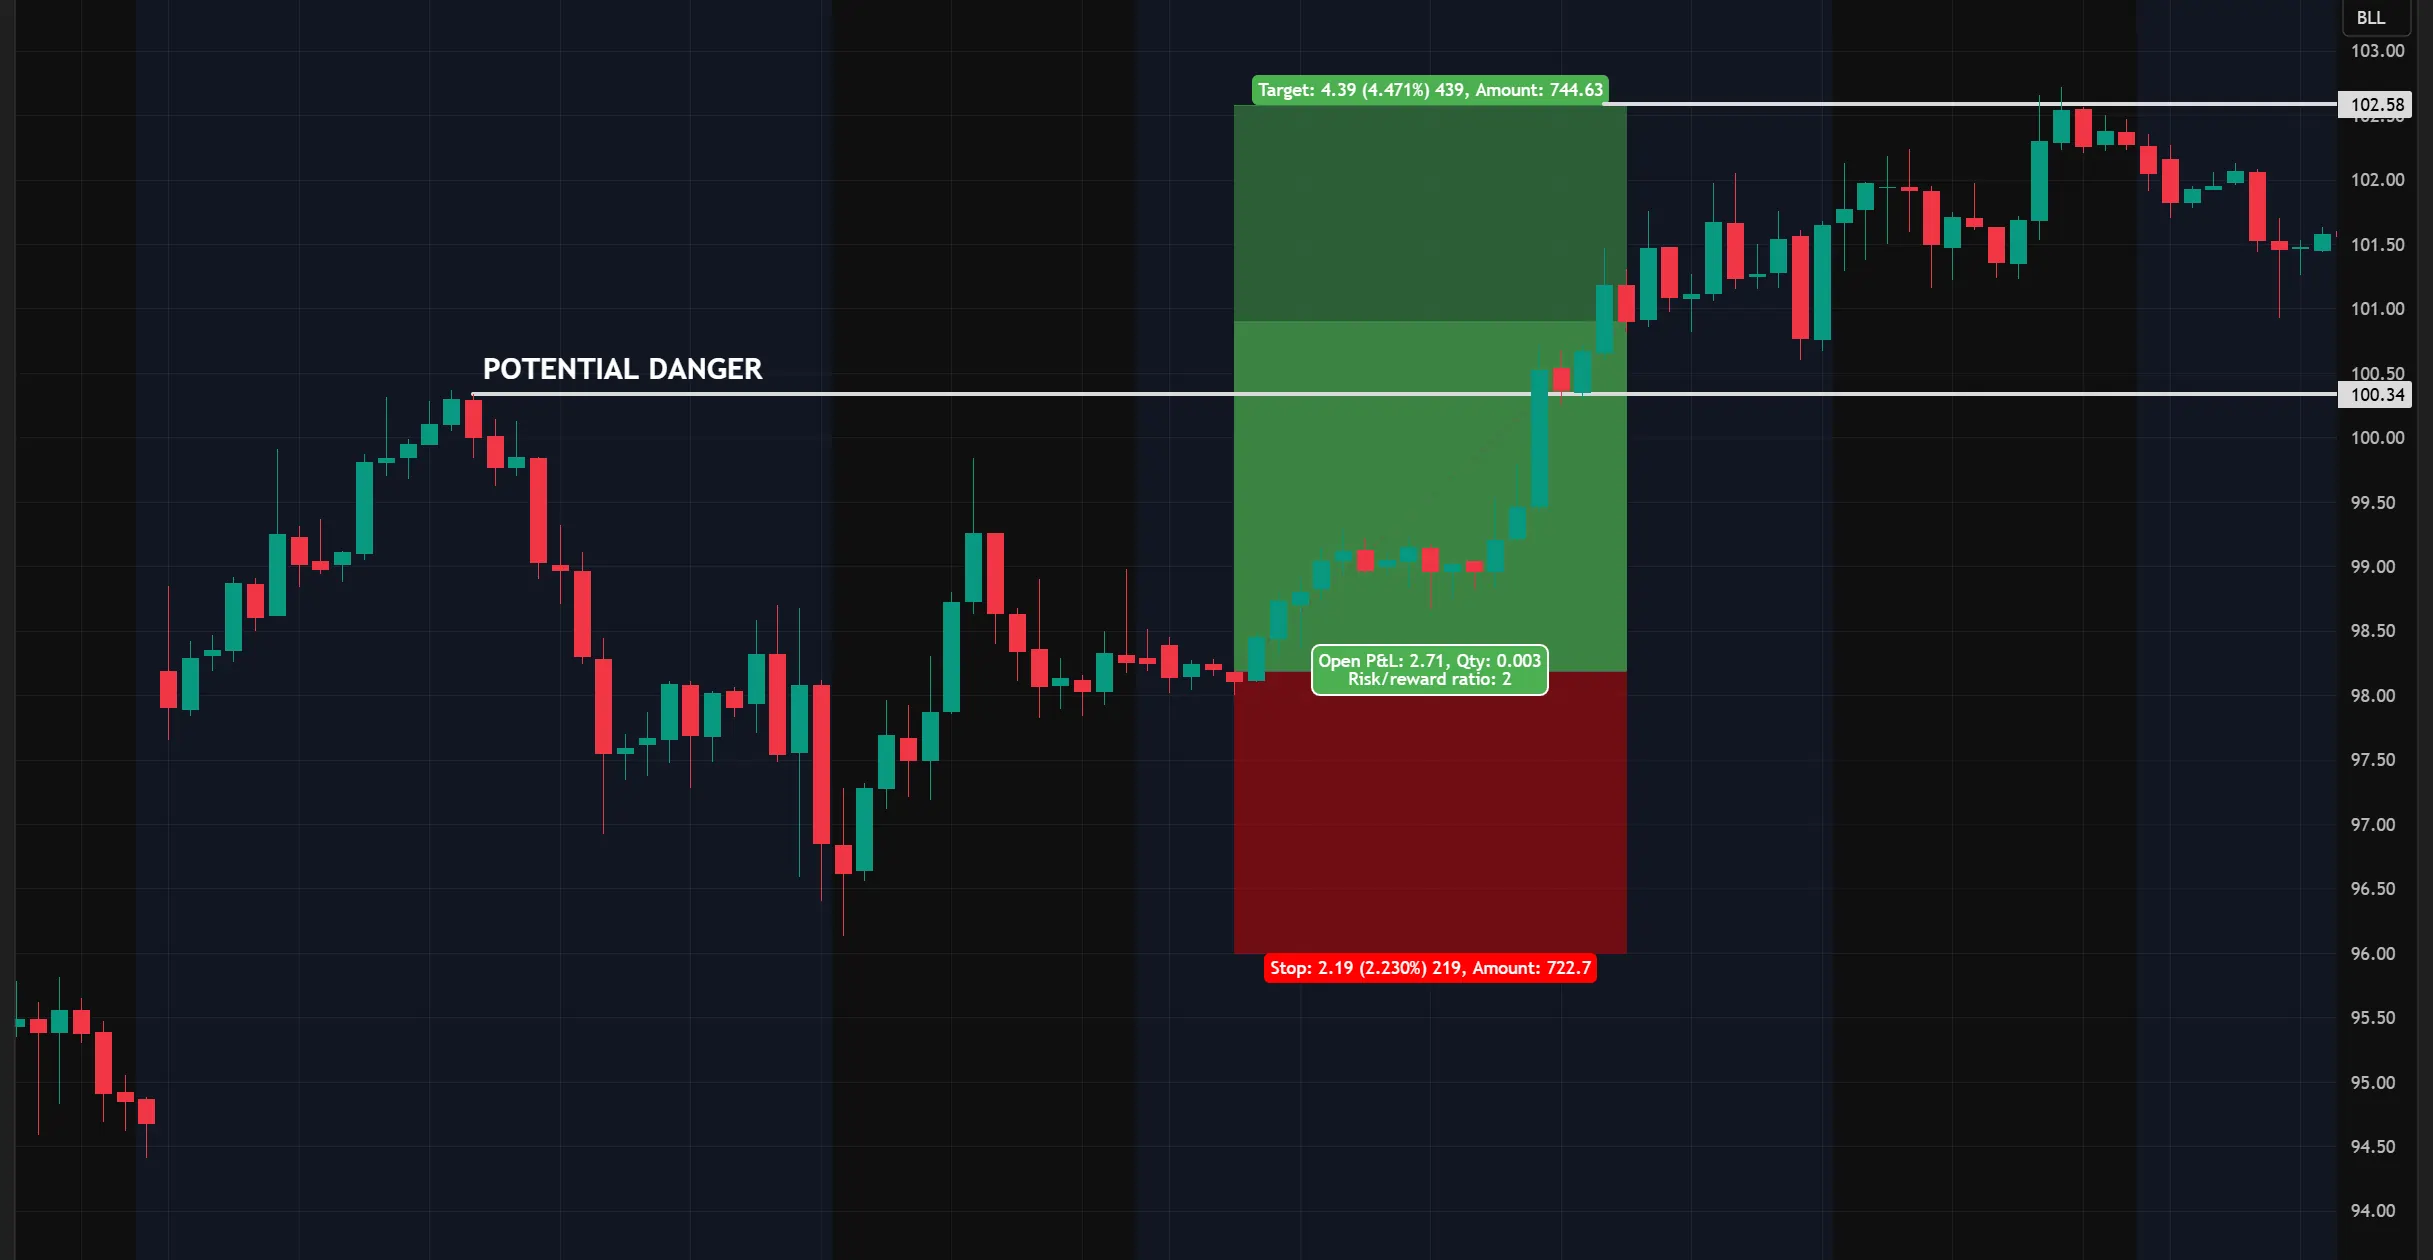
If your 2R target sits above a major resistance zone, the chart is giving you a problem to solve. Price may stall before your target. Holding only because the ratio says “2R” is not discipline. It is stubbornness.
A 2:1 target in a strong trend may be too conservative. A 2:1 target in a compressed range may be unrealistic. The same ratio can mean very different things in different market conditions.
Use the ratio to judge reward.
Use structure to judge location.
Do not confuse the two.
How to Set Profit Targets Using Market Structure
Market structure gives your target a reason.
Start with levels price has already respected: prior swing highs, swing lows, support zones, resistance zones, consolidation shelves, gaps, and major reaction points.
These levels matter because buyers and sellers have reacted there before.
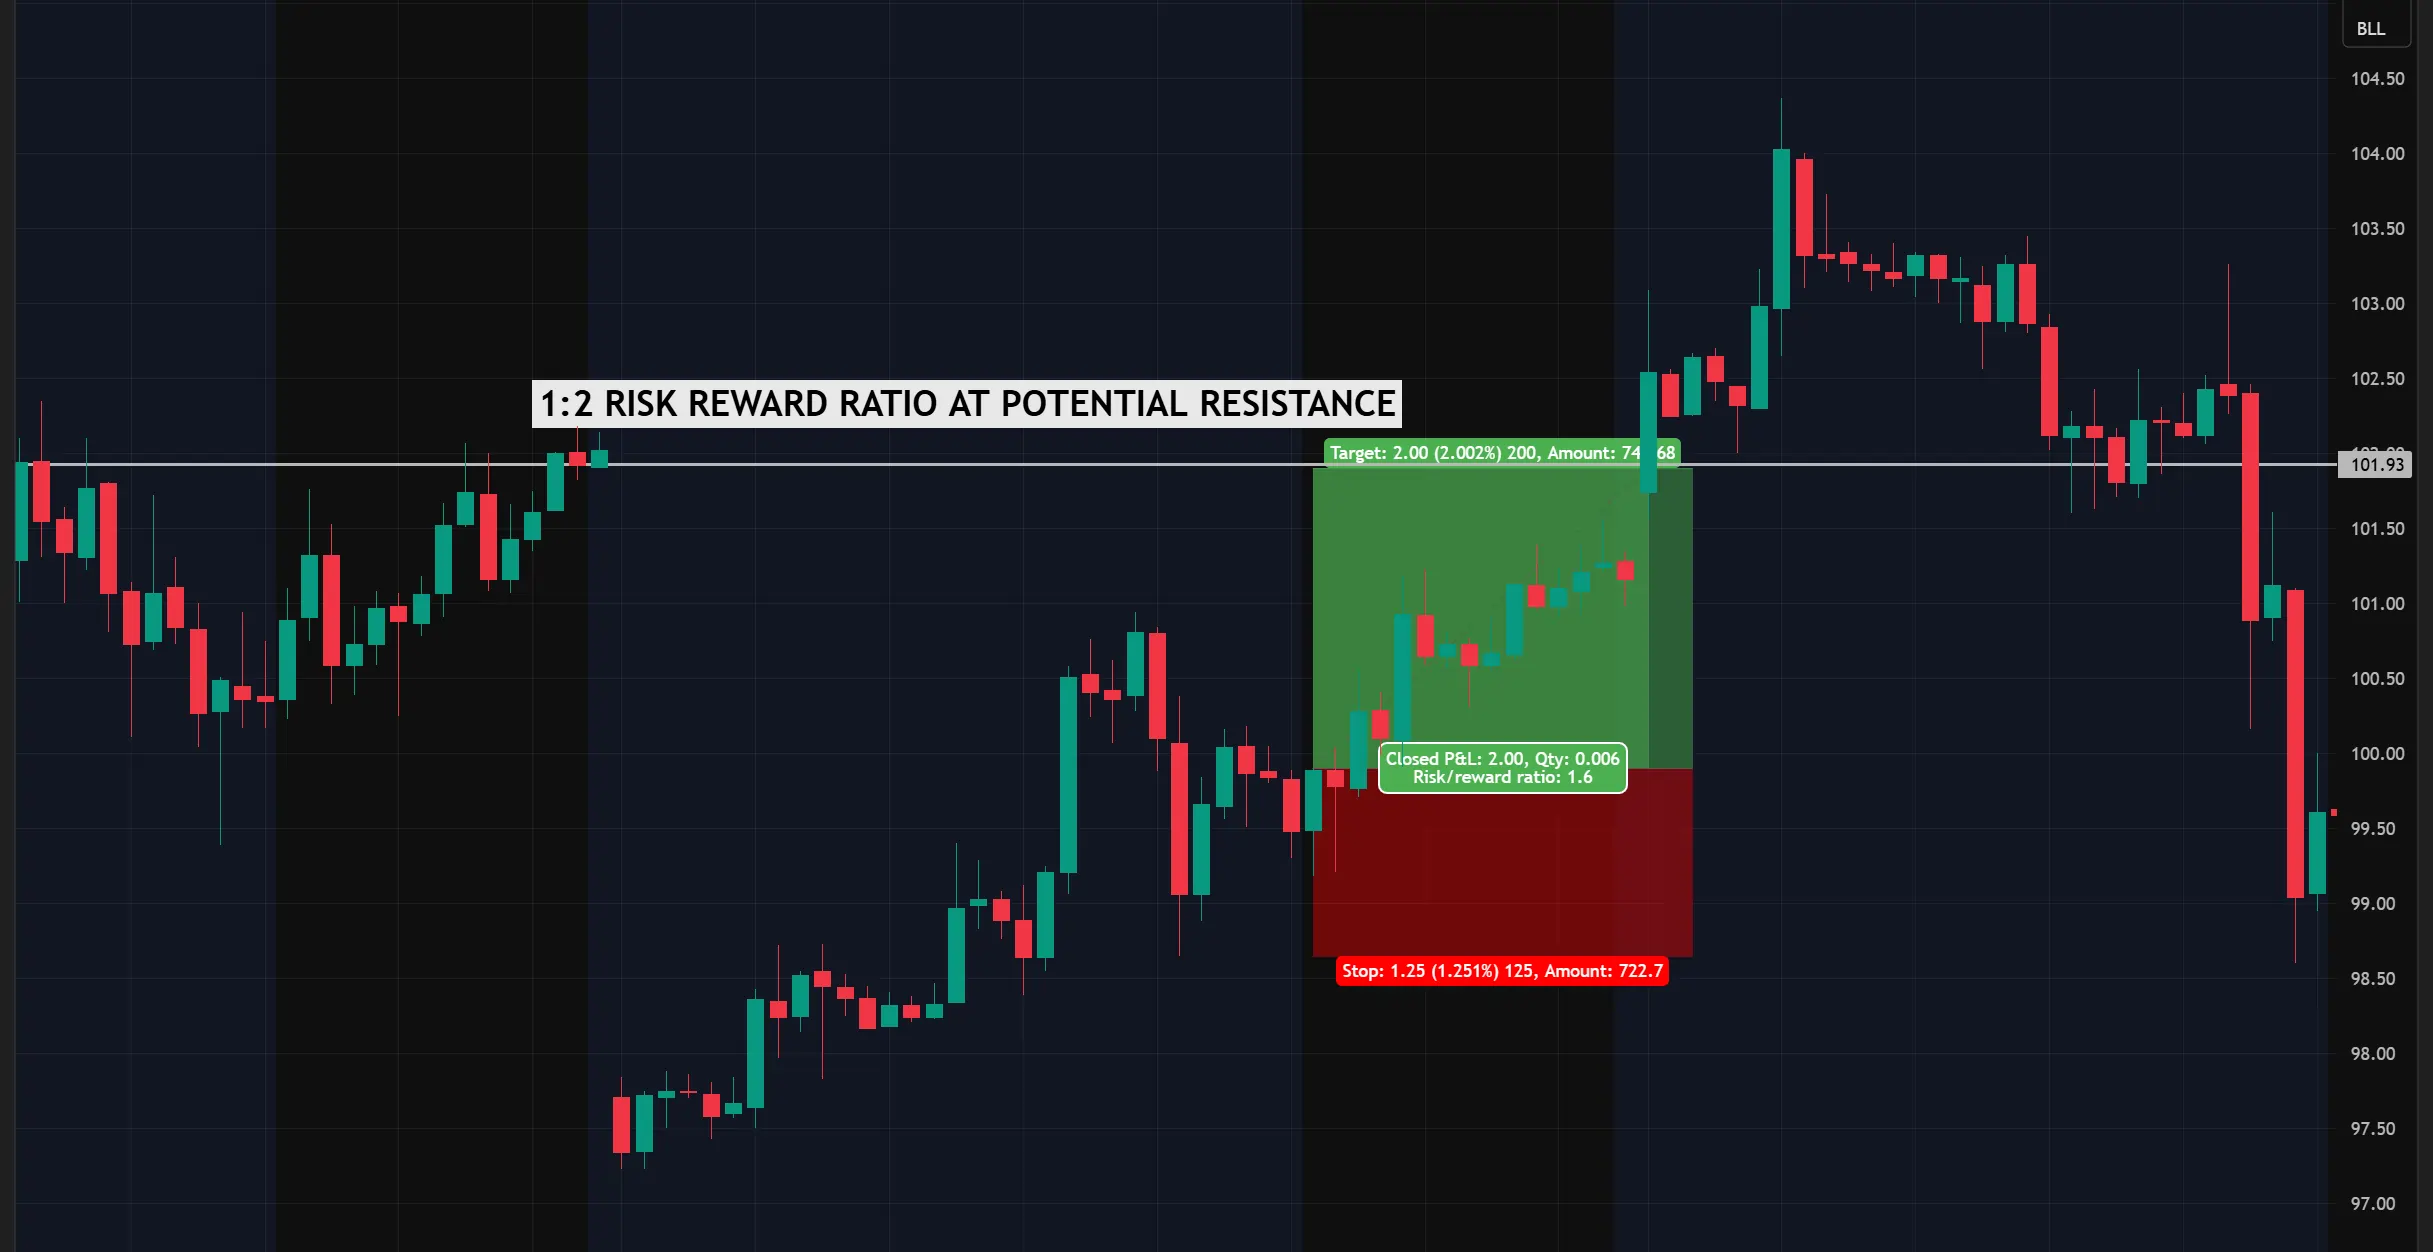
For a long trade, the first logical target is often near the next resistance area or prior swing high. For a short trade, it is often near support or a prior swing low.
The word near matters.
If resistance is the reason for the exit, placing the target far beyond resistance assumes a breakout before you take profit. That may happen, but it should not be the default assumption.
Use higher timeframes to identify stronger levels. Use your trading timeframe to refine the exit.
Structure first.
Precision second.
Execution last.
How Your Stop Loss Changes the Target You Need
Your stop is not just protection.
It defines the trade.
The distance between entry and stop tells you how much risk the setup requires. Once that risk is defined, your target must justify it. A wider stop needs more room to produce an acceptable reward. A tighter stop may improve the R-multiple, but only if the stop is placed where the trade idea is actually wrong.
You should not tighten the stop just to make the trade look better.
That is fake precision.
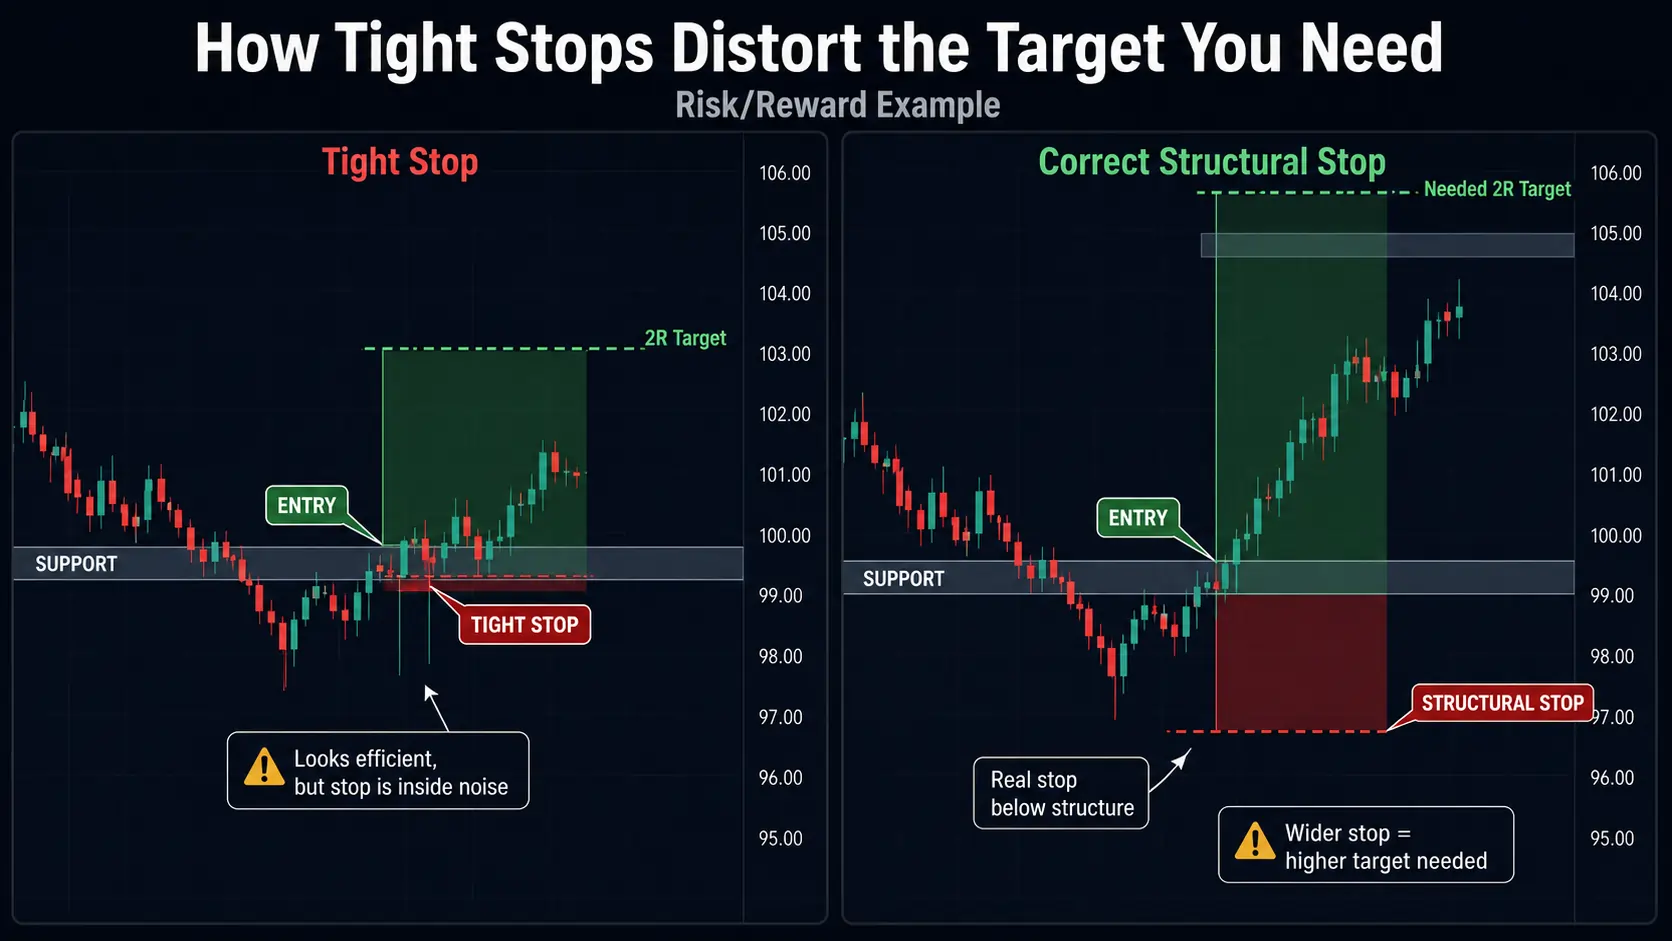
A stop belongs at a level that invalidates the setup. If the correct stop makes the target unrealistic, the solution is not to force the math.
The solution is to pass.
Volatility matters here. In choppy markets, price often needs more room. That may require a wider stop, which then requires a more distant target. But if the chart does not support that target, the setup is weak.
Your stop and target are not separate decisions.
They are one equation.
Does the Trade Have Enough Room to Reach the Target?
A good entry still needs space.
Before entering, look between your entry and your target. Ask what price has to get through.
Is there resistance nearby?
A prior swing high?
A consolidation zone?
A moving average?
A volume-heavy area?
A round number traders may react to?
If those barriers sit directly in the path, your target may be blocked and price may react against your direction.
You should not assume price will clear every obstacle because your setup looks clean. Direction is only part of the trade. Distance matters too. You will hit many more 1:1 target than you will 1:2,3 targets.
ATR can help test whether the move is realistic relative to recent volatility. ATR, or Average True Range, measures how much an asset has been moving over a chosen period. It does not predict direction. It helps you judge whether your target is reasonable compared with recent movement.
If the target requires a move far beyond the instrument’s normal range, you need stronger evidence for why conditions may expand.
That does not mean price cannot reach the level. It means the target needs more justification.
Should You Use Support, Resistance, ATR, or R-Multiples?
Each tool answers a different question.
Support and resistance show where price may react.
ATR shows whether the target is reasonable relative to current volatility.
R-multiples show whether the potential reward justifies the risk.
None of them should control the trade alone.
Which Tool Should Guide Your Profit Target?
Structure, ATR, and R-multiples are often treated as interchangeable. They are not. Each tool answers a different part of the target-setting decision.
| Tool | Best For | What It Tells You | What It Does Not Tell You | Best Use |
|---|---|---|---|---|
| First Structure | Finding likely reaction zones. | Where price has responded before: swing highs, swing lows, support, resistance, consolidation, and prior reaction areas. | Whether the reward justifies the risk or whether the move is realistic under current volatility. | Use it to choose the target zone. |
| Second ATR | Testing whether the move is realistic. | How the target distance compares with recent price movement. | The best exit location or where price is most likely to react. | Use it to check whether the target is reasonable. |
| Third R-Multiple | Judging trade quality. | Whether the potential reward is large enough compared with the defined risk. | Where the target should go on the chart. | Use it to decide whether the trade is worth taking. |
A resistance level may be obvious, but if it only offers 0.7R, the reward may not justify the risk. A 3R target may look attractive, but if it sits beyond multiple structural barriers, it may be too ambitious for the setup. ATR may keep expectations realistic, but volatility alone does not tell you the best exit location.
You should not pick one method and ignore the rest.
Use structure to choose the target zone.
Use R-multiple to judge trade quality.
Use ATR to test whether the move is realistic.
That is a process. and a single formula is not.
When Should You Take Partial Profits?
Partial profits are useful when the chart earns them.
They are not a cure for fear.
A partial exit can make sense when price reaches a meaningful structure level before your final target. You lock in part of the gain, reduce pressure, and keep some exposure if the move continues.
That can be smart trade management.
But scaling out by default can also weaken your results. If you cut every winner too early, your best trades may not pay enough to offset your losses.
You should not take partial profits just because you are nervous.
Use partial exits when:
- Price reaches a major support or resistance level
- The first target is hit and the next target still has room
- Momentum slows near structure
- Volatility expands and the trade becomes harder to manage
- You want to hold a runner without leaving the full position exposed
A simple plan can look like this:
| Exit Point | Action | Purpose |
|---|---|---|
| First structure target | Take partial profit | Lock in part of the gain |
| After first exit | Adjust stop based on structure | Reduce remaining risk |
| Final target or trailing stop | Exit remaining position | Capture continuation if it develops |
The goal is not to feel safe. The goal is to manage the trade according to price behavior.
Structure earns the partial. Emotion does not.
When Should You Use a Trailing Stop Instead of a Fixed Target?
Sometimes a fixed target is the wrong exit.
If price breaks out cleanly and there is no obvious resistance overhead, a fixed target may cap the trade before the move has fully developed. In that case, a trailing stop can be more appropriate.
A trailing stop lets you stay with the move while defining where the trade no longer deserves the same exposure.
But you should not trail every trade.
Trailing stops are usually more useful when momentum is strong, pullbacks are controlled, and structure continues to form in the direction of the trade. They are weaker in choppy markets where price repeatedly pulls back through obvious stop areas.
Trail behind real structure:
- Higher swing lows in an uptrend
- Lower swing highs in a downtrend
- A relevant moving average
- ATR-based distance adjusted for volatility
- Prior breakout levels that should now hold
Do not trail based on random percentages.
That is not structure.
That is another shortcut.
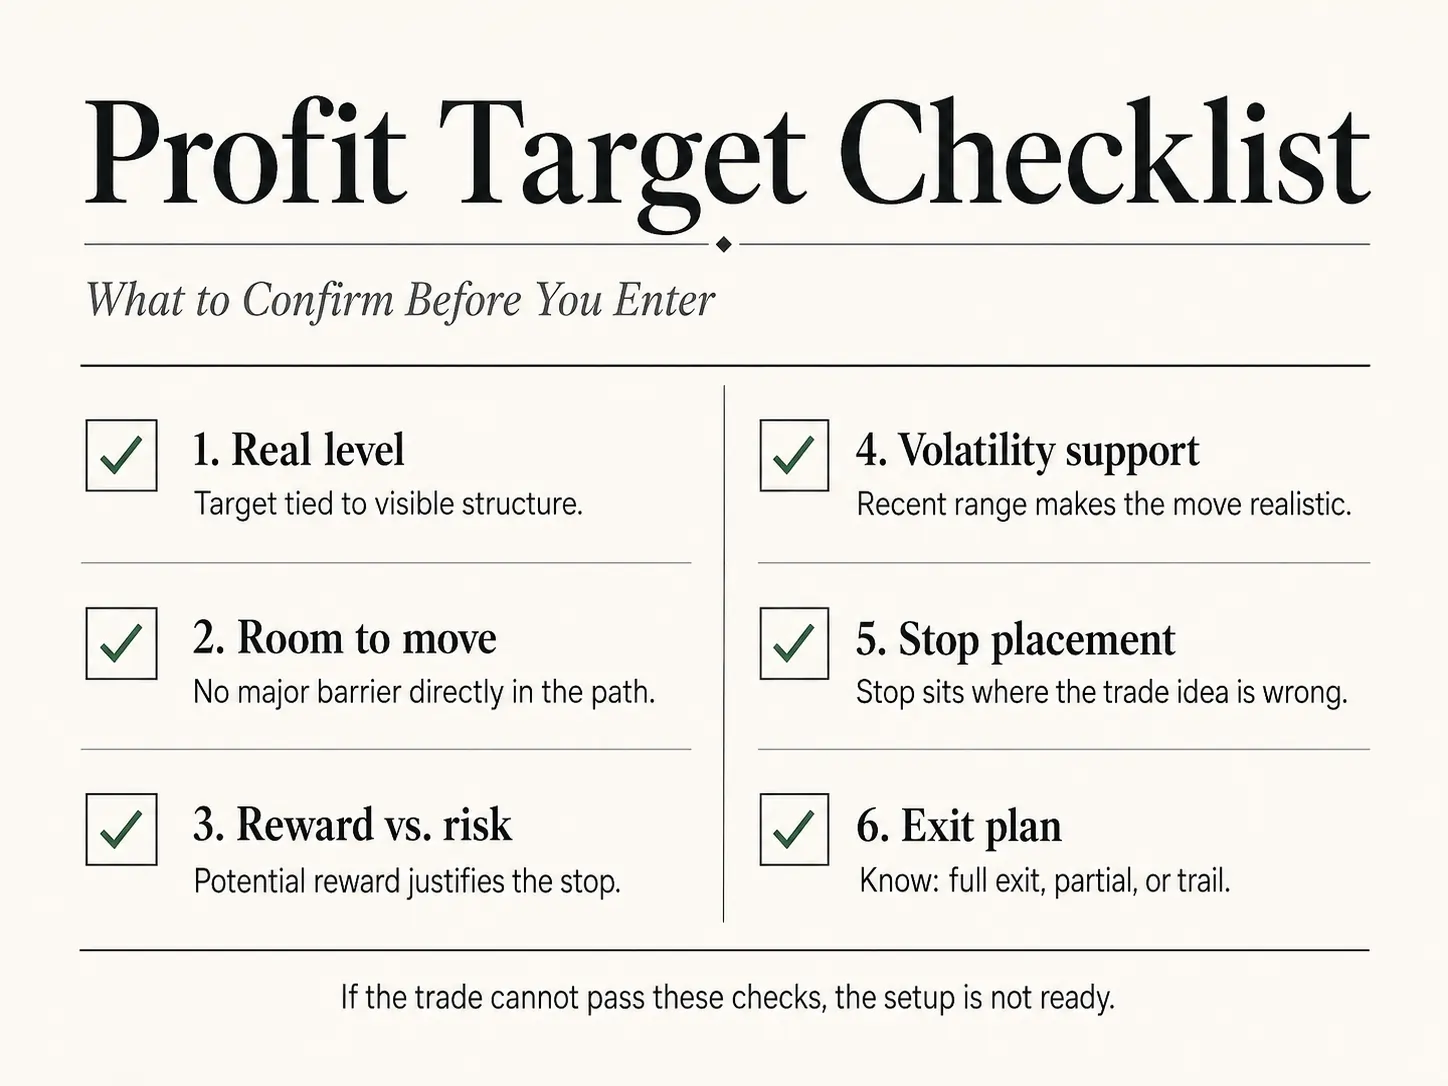
Before you enter, run the trade through this checklist.
1. Is the target based on a real level?
If the target is a round number, a desired dollar amount, or a number picked for comfort, it is weak.
A real target should connect to visible structure.
2. Does price have room to reach it?
Look for barriers between entry and target. If resistance, support, or congestion sits directly in the way, adjust the plan or skip the trade.
3. Does the reward justify the risk?
If the target does not offer enough reward relative to the stop, the trade may not be worth taking.
4. Does volatility support the move?
Compare the target with recent range and momentum. If the target requires unusual expansion, the setup needs stronger evidence.
5. Is the stop placed where the idea is wrong?
If the stop is random, the target calculation is already compromised.
6. Do you know what happens at the target?
Decide before entry: full exit, partial exit, or trailing stop.
Do not improvise under pressure.
If the trade cannot pass these checks, you do not have a setup worth taking.
You have an opinion.
Common Profit Target Mistakes
The first mistake is setting the target around a “need”.
You need to make back a loss. You need the trade to hit a certain dollar amount. You need the setup to work.
The market does not care.
The second mistake is forcing a target beyond structure. If resistance is nearby, pretending it is not there does not make the trade stronger.
The third mistake is changing the target for emotional reasons. Extending a target because price is moving fast can turn a good trade into a missed exit. Cutting a target because you feel nervous can damage your reward profile.
That does not mean targets can never change.
They can change when the structure changes. They should not change because your emotions changed.
The difference matters.
Frequently Asked Questions
Should beginners use fixed targets or structure-based targets?
Beginners can use fixed R-multiple targets as training wheels, but they still need to check structure.
A 2R target is not useful if price has a major barrier before it.
Start simple. Do not trade blind.
Can profit targets change after entry?
Yes, but only for a structural reason.
A target may need adjustment if volatility changes sharply, price rejects a major level, news alters conditions, or the original structure breaks down.
You should not change the target because you feel impatient, greedy, or afraid.
Are ATR-based targets better than support and resistance?
No.
They do different jobs.
ATR helps measure whether the move is realistic. Support and resistance help locate likely reaction zones. The stronger approach is to use both.
Should every trade have a profit target?
Every trade should have an exit plan.
That may be a fixed target, a partial-profit plan, or a trailing stop. What matters is that the exit is planned before entry and connected to the trade idea.
What is the biggest mistake in setting profit targets?
The biggest mistake is setting the target where you want price to go instead of where price has a reason to go.
That mistake affects entries, exits, position sizing, and risk management.
It is not small.
Conclusion
Profit targets are trade decisions.
Set them before entry. Build them from structure. Test them against risk. Check whether volatility supports the move.
Then decide whether the trade deserves capital.
You should not force a target because the ratio looks good. You should not move the target because the trade feels exciting. You should not enter before you know where the exit belongs.
If the target is clear, the risk is justified, and price has room to move, the trade may be worth considering within your plan.
If not, leave it alone. That is not hesitation. That is discipline.
