- April 5, 2017
- Posted by: Shane Daly
- Categories: Advanced Trading Strategies, Trading Article

When two or more things collide, a disaster can result.
It doesn’t matter if it is two storm fronts or a vehicle collision. When things collide, many times good things do not result.
In trading, the collision of two or more things can be a blessing! Many times it can spell the difference between success or failure of a trade.
Think of this….if many people are looking at “X” and then something happens at “X”, expect a reaction. If many people are looking at “Y”, expect a reaction.
What if “X” and “Y” meet and you get twice as many people looking at the same thing?
A bigger reaction?
Perhaps , but at least a greater chance of something happening.
Definition Of Confluence
To define a confluence is simple: “an act or process of merging”.
When two or more variables are present, a confluence exists and these areas are a good place to look for a trading opportunity.
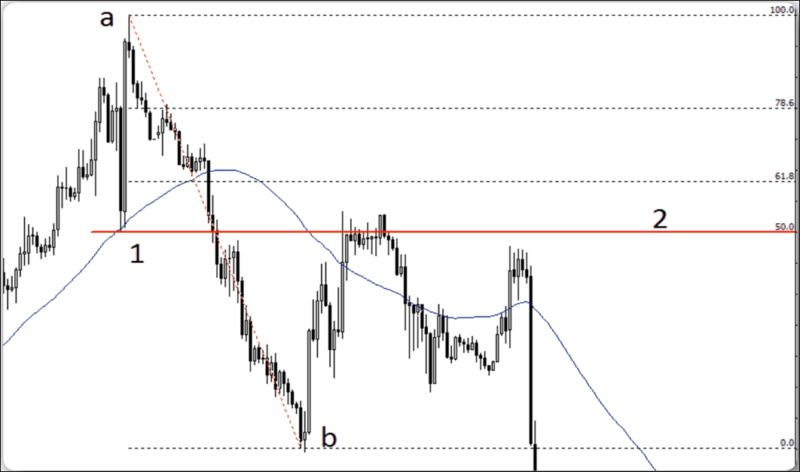
Let’s take a walk through this Forex chart and see if we can find a confluence of variables through technical analysis.
A. Is the top of the move
B. is the bottom of the move

A simple Fibonacci retracement is drawn from point a to point b and several levels are drawn on the chart.
- Is where price shot higher from and that price level is obviously supporting price at that time. Price does eventually tumble through that level albeit a little hesitation just below it. The red line represents a price area that once supported that price.
- Is the 50% retracement level which happens to coincide exactly at that former support area.
You can clearly see that price rallied from “b” right to that area. The moving average is pointing down giving you an objective trend direction to take a trade. How you enter your trade, is up to you. It could be a range breakout or a trend line break. Perhaps you dialed down to a smaller time frame and saw a candlestick pattern.
The point is that a confluence of a former support level and a Fibonacci retracement area gave you an objective area in advance to look for a trade if price returned.
Results Of Confluence Trading

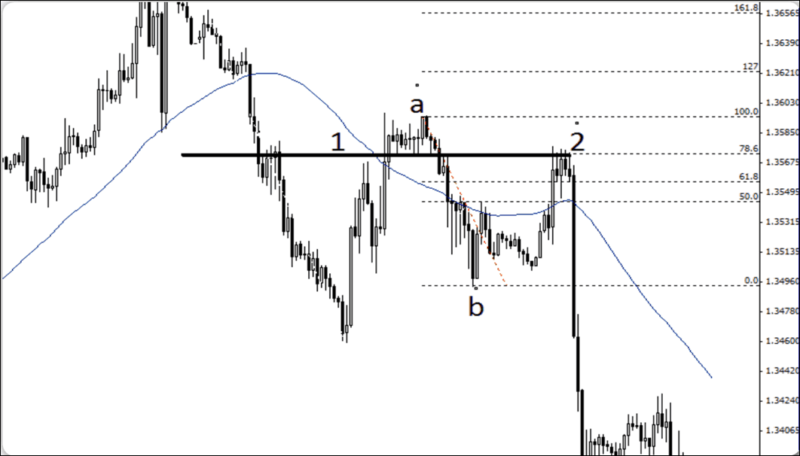
Line 1 is the bottom of the range of price at “A”. A Fibonacci retracement is drawn from A-B giving you areas to look for price to return to.
Price rallies to the 78.6% level (which is actually a great level due to where order blocks are found on the charts) and notice the huge drop after price hits the 78.6% level. (as an exercise, go through charts and see how price reacts on that level!).
The first chart gives you about 80 pips and the second one is over 200 pips!
A confluence is a great thing to look for when going over your charts. It is a proactive exercise to pinpoint trading zones where if price returns that you can look to take some action. Even better, it can force you to be more selective in your trades which can alleviate the “disease” of over trading.
Finding Trade Exits Using Confluence
Since we can enter the market using confluence, what about exiting? There are also high probability areas where price can stall or reverse and these are the areas you would want to either exit at OR lock in some profit. What you do is dependent on your trade plan, the overall direction of the market and your goals with the trade.

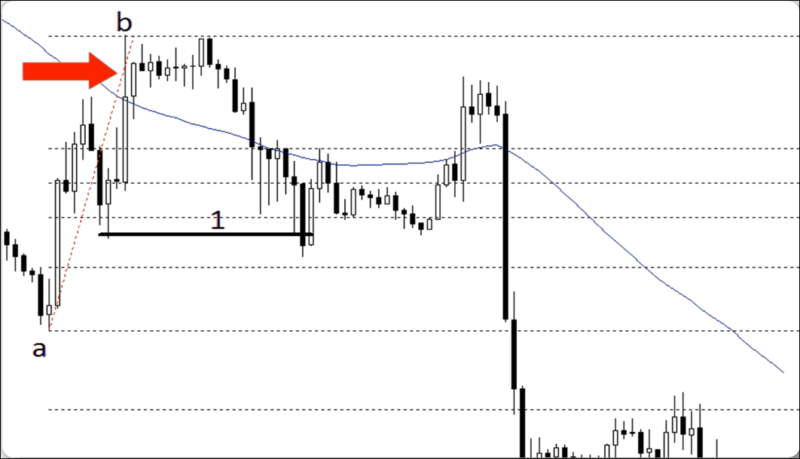
The red arrow indicates the area that we looked for in advance of the price returning to that area. Price breaks lower but where to exit?
“A” is the low of the original move while “B” is the completion. A simple Fibonacci retracement show that the 61.8% level lines up with a zone where price was rejected from (see black line). That move down is about 70 pips from the bottom of the trade zone.
You may have made more or less depending on how you enter that trade. The point though is a combination of Fibonacci and a support area gave you an objective area to exit. As an added point, that level also coincides with the 127% fib so either the extension tool or the retracement tool gives you the same area.

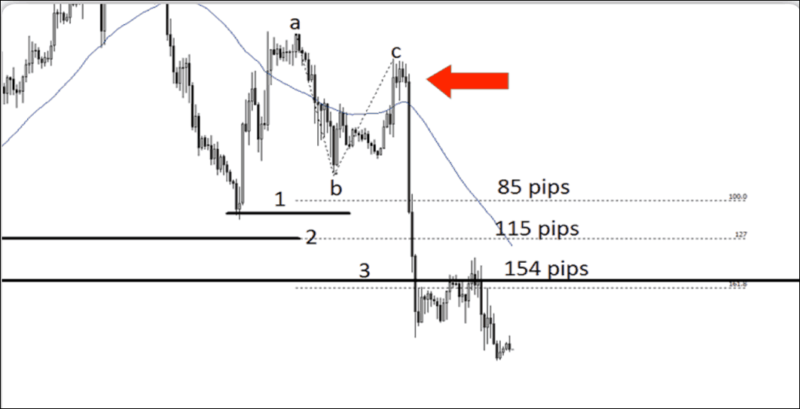
Here, we simply used the a-b-c move to give us Fibonacci expansion levels and the red arrow is where the trade originates from.
- Line 1 has its zone at a level where price was once supported and lines up with the 100% extension area. If you were reading price action, there is really no reason to exit right at the level as price sliced through it like butter.
- Line 2 is the 127% level but to the left, it just lines up with a cluster of trading activity but neither a support or resistance level.
- Line 3 lines up with the 161% level PLUS lines up with a support zone to the left. Although price sliced this level, it started to find some balance in that area. Here, is either a great place to take some profit, all profit or lock in profit.
If you were in this trade, you may want to do some higher time frame analysis to see where you are in the bigger picture considering that an uptrend is still intact although weakening.
I don’t know many traders who use one variable to find a trading opportunity. Even a simple pullback trade may need a confluence of factors such as:
- Strong momentum move to show strength in the market
- A low volatility pullback into a zone of support or resistance
- A candlestick reversal pattern to indicate the potential of a move in the previous direction
Hope you can see how a confluence of factors (this example using simple fibs and s/r zones) can give you objectivity in your trading when looking to not only enter, but exit your trades.
